Deployment of a Node.js project on AWS - Part 2
This is continuation of a story about the deployment of a Node.js app that I developed with a partner. This app is deployed on AWS and we used Dokku to deploy the app. Dokku provides containerization via Docker, as well as Git integration and an nginx server.

Following up on Part 1. I'll show you the steps involved for the rest of our deployment. We will set up Dokku, Mongodb, the domain, DNS servers and make sure we have all the right ports allowed.
We'll start with Dokku. First we have to log into the remote server. For me the command looks like this:
The following ssh command will allow us to connect:
ssh -i "Nick.pem" [email protected]
On the remote machine we need to run the install script for dokku. That is done using the wget command to download the script and then execute it. The command is:
wget https://raw.githubusercontent.com/dokku/dokku/v0.4.14/bootstrap.sh
After that you need to run the following command to execute the script:
sudo DOKKU_TAG=v0.4.14 bash bootstrap.sh
That will install Dokku and its dependencies from the Ubuntu APT repositories. Now we can set up the app.
This will create your app:
dokku apps:create claims
Next create the mongo database:
dokku mongo:create mongo_claims
Then link the database and app:
dokku mongo:link mongo_claims claims
So now we have an app called "claims" and a mongo database named "mongo_claims" and they are linked together. You can confirm the names by running dokku mongo:list to check the database and dokku apps to list your apps.
Great Dokku is set up now we have to deploy our app. This is done using git and a special Dokku repository. The repo is already set up on the remote server as part of the app build we just have to connect to it from our dev machine.
The command is like this:
git remote add dokku [email protected]:claims
I blocked out part of my IP for obvious reasons. The app's name is "claims". This command must be run from the root folder of your app, the same as other git commands.
Once we're ready to deploy it is as simple as a git push.
Like so:
git push dokku master
You will git all kinds of output in the terminal. Dokku will tell you all the things that it is doing and provide feedback. It takes about 5 minutes so sit back and grab some popcorn.
Dokku will give you the ports for the docker instances of the app and for nginx. If you plug your IP address into your browser and add the nginx port to the end the app should be live.
OK lets set up the domain name and link it to the app. We did everything through AWS just out of convince but you can buy a domain anywhere. Amazon's domain services are called Route 53. Apparently the service name (Route 53) is a reference to TCP or UDP port 53, where DNS server requests are addressed.
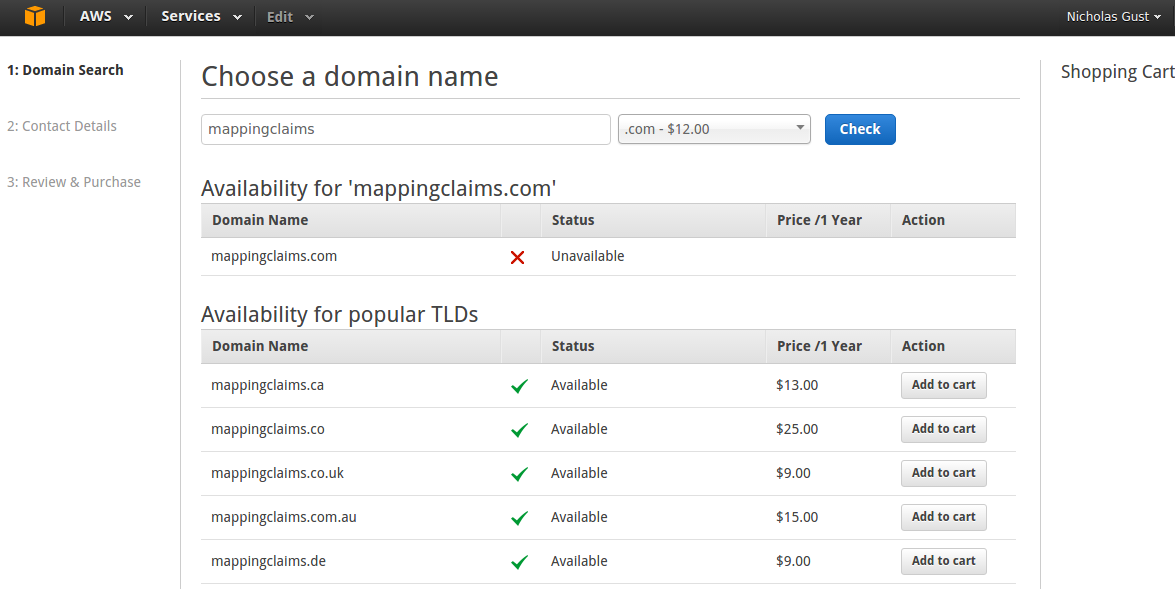
On the Route 53 home page there is a search area for domain names. Just type in your desired name and hit "Check". You will be brought to a page that lists the prices and availability for your chosen name. We decided on MappingClaims.com since it was available. Amazon's price of $12/yr is reasonable.
Once purchased you have to fill out your name and address for the WHOIS info. Make sure you make that info private or you could be a victim of identity theft.
After filling out all the domain stuff you will be directed back to the main Route 53 page. From there clink on the "hosted zones" link to configure your domain. All you have to do here is change the ip address that I indicated with the arrow below.
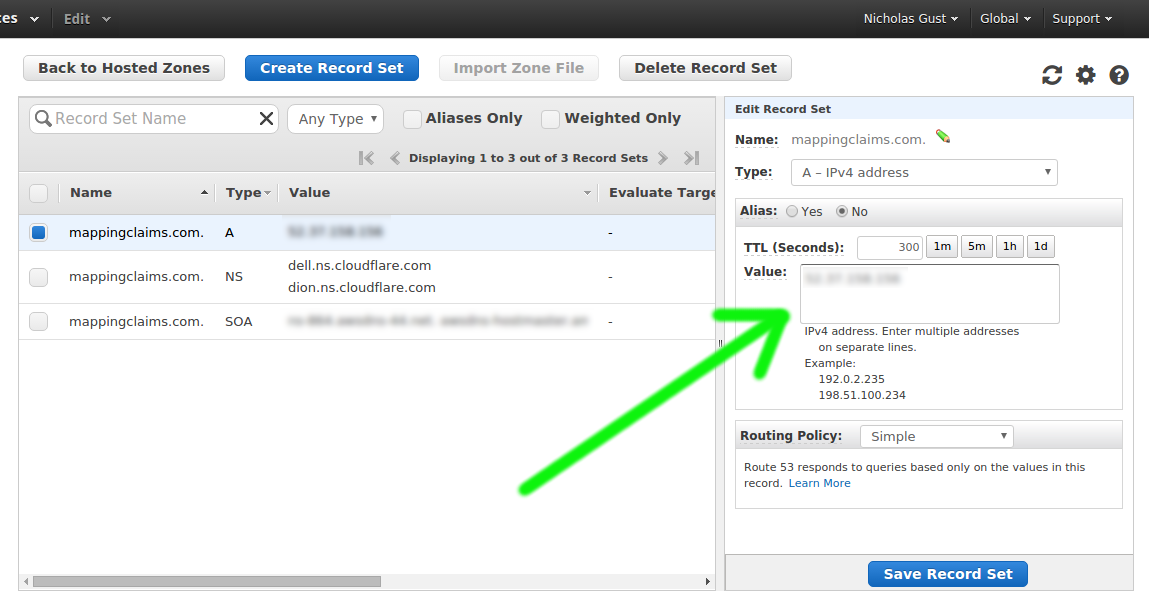
Once you enter your IP address click "Save Record Set" and you are good to go. It might take a few minutes for the domain to update but soon after you should be able to connect to the site. Enter your domain name in a browser followed by the nginx port number (ie mappingclaims.com:37275).
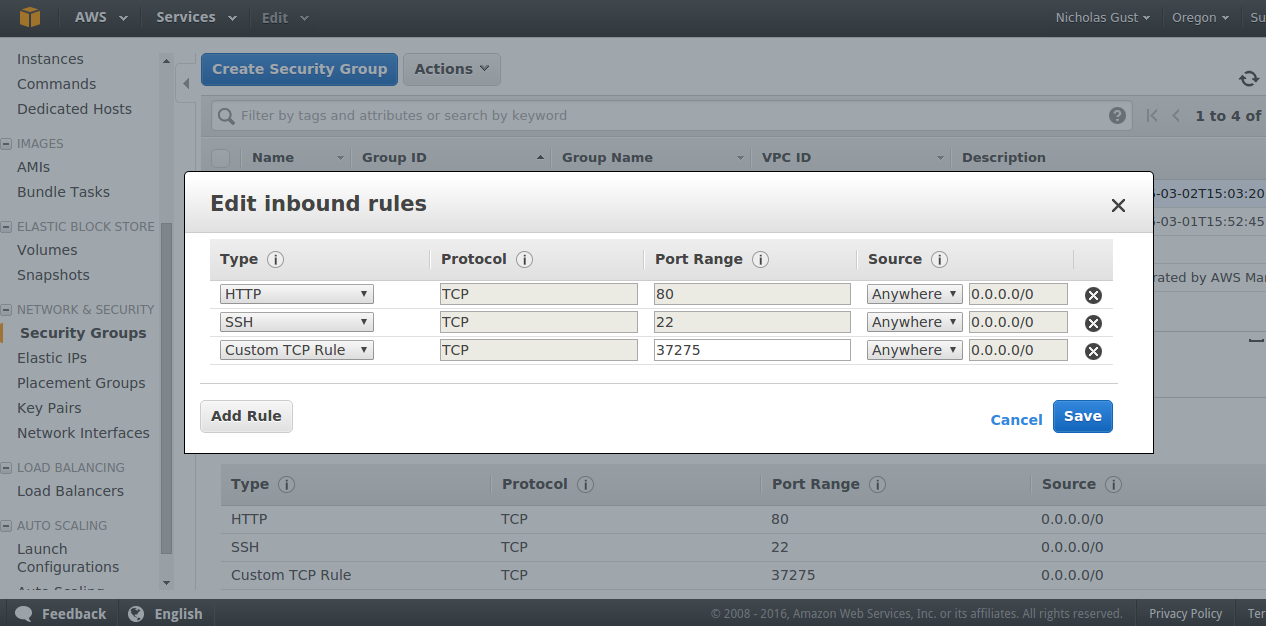
You will have to open up a port on your instance to allow access. On the AWS console navigate to the EC2 panel. Then find the network and security section on the left side scroll menu. Click on "Security Groups". Then click on your instance and select the inbound tab in the bottom section. Then click "Edit". You should see a window like the one below. Fill in your port number instead of mine.
At this point we are looking pretty good. The app is on a real domain name and works. It doen't have data in the mongo database yet, lets take care of that now. This is a bit complicated but we'll get through it.
The data that we used for this mapping app is geospatial in nature and requires a special index in mongo. The way to import that data with Dokku goes like this. First dump the dev database, then transfer the dump file to the server. On the server import the dump file.
This command will create a BSON dump file:
mongodump --db claims --collection docs4 --out /location
In the above case our local database is named "claims" and the collection is "docs4". The location can be wherever you want the file to end up.
To upload the file to your server you can use SCP. My command looks like this:
scp -i "Nick.pem" docs4.bson [email protected]:docs4.bson
Now that the file is on the server you have to tweak it a bit. I learned this through trial and error. Mongo on Dokku will only accept dump files in a tar format. To create the proper file we log into the server and create a directory called "dump". Move the bson file inside the folder. After that you have to turn the folder into a tarball.
The tar command is:
tar -cvf dump.tar dump
Now all we have to do is import it into mongo. Dokku has a bunch of mongo tools that you can see by running dokku help. We're going to use the mongo:import command.
The import command looks like this:
dokku mongo:import mongo_claims dump.tar
You will get a progress indicator and some feedback. It should look something like this:
$dokku mongo:import mongo_claims < dump.tar
2016-03-05T18:04:17.255+0000    building a list of collections to restore from /tmp/tmp.6S378QKhJR/dump dir
2016-03-05T18:04:17.270+0000    restoring mongo_claims.docs4 from /tmp/tmp.6S378QKhJR/dump/docs4.bson
2016-03-05T18:04:20.729+0000    [############............]  mongo_claims.docs4  22.3 MB/44.2 MB  (50.3%)
2016-03-05T18:04:22.821+0000    [########################]  mongo_claims.docs4  44.2 MB/44.2 MB  (100.0%)
2016-03-05T18:04:22.822+0000    no indexes to restore
2016-03-05T18:04:22.897+0000    finished restoring mongo_claims.docs4 (41512 documents)
2016-03-05T18:04:22.897+0000    done
At this point we are pretty much set. The app is deployed, the database is set up and we have a domain. Just one last thing to take care of. Let's drop that port number from the site address.
It took me a while to figure this out, there's not much on the internet about this issue. I messed around with the Ubuntu iptables with no luck. I turns out that Dokku has a command to change the nginx port.
It goes like this:
dokku config:set claims DOKKU_NGINX_PORT=80
Then you have to open up the port in Ubuntu's firewall:
sudo iptables -A INPUT -p tcp --dport 80 -j ACCEPT
That's it we're all done. This is the process that I used to deploy my Node.js app on AWS. Hopefully it worked for you too.