Real Time Action in Rails on AWS
One of the apps that I have been working on needed a way to communicate with users in real time. Ruby on Rails historically doesn't work this way. That's where modern front-end frameworks like React or Angular.js excel.

I looked high an low for a simple solution that wouldn't dramatically alter the stack for the application that is already mostly developed.
Makeanexam.com has a section for teachers to administer exams to a classroom of students. Originally I developed a system to push a notification to all the students of the class but they had to refresh the page to see it. What we needed was a way to notify all the students that the exam was about to begin in real time.
Enter Action Cable.
In Rails 5 Action Cable seamlessly integrates websockets into the Rails ecosystem. It seems to have had things like chatrooms in mind but that works for our application. Action Cable is based on the Pub/Sub model where a group of people "subscribe" to a "channel" and information is published to all the subscribers.
In order to allow for a live connection between the client and server, we need another layer to make this work, on my production environment I had to add a Redis server using AWS ElastiCache.
Let's get started.
You don't need to add any gems since Action Cable is already part of Rails. First we need to configure our server to listen for websocket requests. We start with the routes.rb file.
Add the following line to mount the Action Cable server on a sub-URI of our main application:
mount ActionCable.server => '/cable'
Now, Action Cable will be listening for WebSocket requests on
ws://localhost:3000/cable
In development, Action Cable can work on the same machine. In production, however, you need a Redis server (more on that later). You'll need to create a file at config/cable.yml to define the Action Cable adapters and URLs. It should look something like this:
development:
  adapter: async

test:
  adapter: async

production:
  adapter: redis
  url: redis://[your_URL].cache.amazonaws.com:6379
That's all the setup for the server side listener (for now). We need to set up listeners for the client side.
First we need to add some javascript to the main JS file.
app/assets/javascripts/application.js

(function () {
  this.App ||  (this.App = {});
  App.cable = ActionCable.createConsumer();

 }).call(this);
Add this to your layout the standard layout is located at: app/views/layouts/application.html.erb.
<%= action_cable_meta_tag %>
The basics are in place for our websocket communication between server and client.
Action cable uses channels to set up the code for different use cases. In the case of Makeanexam.com I deviated a bit from a typical Action Cable set up. We're not doing chat rooms, I want to target individual users who are part of a classroom. There are different ways to handle this but I chose to set up a framework for any user to be targeted by Action Cable and handle the login in my models.
To set up the user cable. Create a file at app/channels/user_channel.rb.
My user channel is really simple and looks like this:
class UserChannel < ApplicationCable::Channel
  def subscribed
     stream_for current_user
  end

   def start(data)
      ActionCable.server.broadcast "user_channel", message: data['message']
  end
end
You might notice that my user channel inherits from ApplicationCable::Channel. The inheritance for Action Cable channels works similar to controllers. The base "channel" allows the User Channel to get the user from Devise. My base channel looks like this:
module ApplicationCable
  class Connection < ActionCable::Connection::Base
      identified_by :current_user

     def connect
      self.current_user = find_verified_user
      logger.add_tags 'ActionCable', current_user
     end

     protected

     def find_verified_user # this checks whether a user is authenticated  with devise
      if verified_user = env['warden'].user
        verified_user
      else
        reject_unauthorized_connection
      end
    end

  end
end
We need to set up some custom javascript for the client to interact with our user cable. This is done using coffeescript (personally I don't really like coffeescript but it's just easier in this case since it's the convention and Action Cable is new to me).
We need to create a file at app/channels/application_cable/connection.rb to define our client side JS/coffee. This is the basic version of my code to set up the modals when an exam starts. I added more code later to allow real-time feedback for the teachers too.
App.user = App.cable.subscriptions.create "UserChannel",

  received: (data) ->
    # Called when there's incoming data on the websocket for this channel
    $('#messages').append data['modal']

   start: (message) ->
    @perform 'start', message: message
OK, we're pretty much wired up. We just need the trigger to get the whole thing going. I added an after_create callback in my ClassExam model to send the exam start modal to all the students. The code looks like this:
class ClassExam < ApplicationRecord
... model code...
  after_create :broadcast

  def broadcast
      self.students.each do |stud|
              user = stud.user
            puts "Broadcast running from class/exam model ..............."
            UserChannel.broadcast_to(
              user,
              modal: ApplicationController.renderer.render(partial: 'students/    exam_student', locals: { :@exam => self.examination, :@class =>     self.classroom, :@class_exam => self }),
            )
        end
  end

end
So what happens here is when a class exam is created the callback sends the modal through the Action Cable channel for every student in that class. The Coffeescript code renders the modal on each of their screens anywhere on the site.
This works great!

Now we need to make it work in production.
This project, like most of my web app projects, is running on Elastic Beanstalk on AWS. There are pros and cons to EBS but it's my favorite platform out there right now.
To get Action Cable working properly with our Elastic Beanstalk environment we have to make a few changes.
Here's what we need to do:
- Create ElastiCache Redis Instance
- Modify Load Balancer to work with Websockets
- Modify Nginx confix for websockets
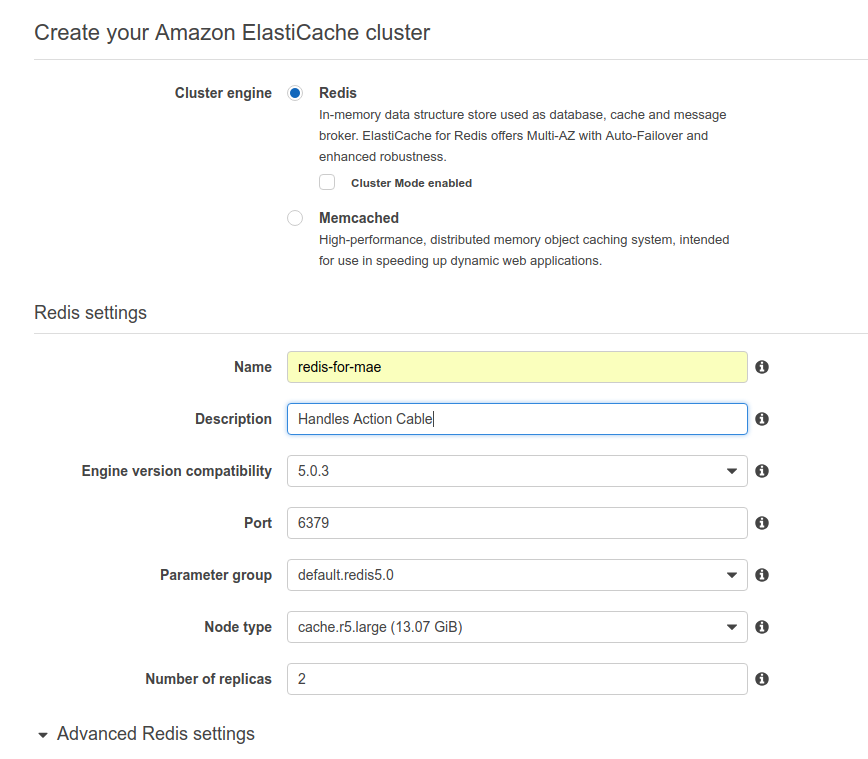
To create the ElastiCache Redis instance navigate to ElastiCache in the AWS console. Choose create and give the instance a name.

In the advanced settings we need to set up a security group that is accessible to Elastic Beanstalk.
That's it for the ElastiCache. Once the Redis instance is live take note of the Primary Endpoint. You will need to let your Rails server know to point Action Cable at that endpoint in production.
Add that url to your config/cable.yml file under production:
production:
  adapter: redis
  url: redis://[your_URL].cache.amazonaws.com:6379
You will also have to specify in your config/environments/production.rb file the urls for Action Cable.
config.web_socket_server_url = "wss://www.makeanexam.com/cable"
config.action_cable.allowed_request_origins =   ['https://www.makeanexam.com', 'http://www.makeanexam.com',   'https://makeanexam.com', 'http://makeanexam.com']
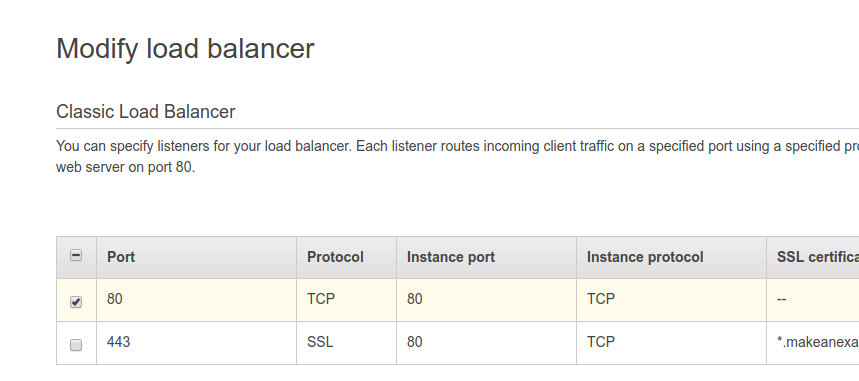
Now for the load balancer. A typical load balancer will be configured to accept HTTP and HTTPS requests. That doesn't work for websockets. So we just had to change those to TCP and SSL.
These are the settings on our load balancer:

The last step is to modify out nginx config. Since Elastic Beanstalk is scalable we need to set up all our config files programatically. This is done in the .ebextensions folder of your project.
I'll include my entire nginx config here so you can see it:
files:
    "/etc/nginx/conf.d/proxy.conf":
      mode: "000755"
      owner: root
      group: root
      content: |
        client_max_body_size 100M;

    "/etc/nginx/conf.d/02_app_server.conf":
      mode: "000644"
      owner: root
      group: root
      content: |

        upstream my_app_new {
          server unix:///var/run/puma/my_app.sock;
        }

        server {
          listen 80;
          server_name _ localhost;

          if ($time_iso8601 ~ "^(\d{4})-(\d{2})-(\d{2})T(\d{2})") {
        set $year $1;
        set $month $2;
        set $day $3;
        set $hour $4;
        }
        access_log  /var/log/nginx/access.log  main;
        # access_log /var/log/nginx/healthd/    application.log.$year-$month-$day-$hour healthd;

        location / {
          if ($http_x_forwarded_proto != 'https') {rewrite ^     https://$host$request_uri? permanent;}
          proxy_pass http://my_app_new; # match the name of upstream     directive which is defined above
          proxy_set_header Host $host;
          proxy_set_header X-Forwarded-For $proxy_add_x_forwarded_for;
          proxy_set_header Connection '';
          proxy_http_version 1.1;
          chunked_transfer_encoding off;
          proxy_buffering off;
          proxy_cache off;
        }

        location /cable {
          proxy_pass http://my_app_new;
          proxy_http_version 1.1;
          proxy_set_header Upgrade "websocket";
          proxy_set_header Connection "upgrade";
        }

        location /assets {
          alias /var/app/current/public/assets;
          gzip_static on;
          gzip on;
          expires max;
          add_header Cache-Control public;
        }

        location /public {
          alias /var/app/current/public;
          gzip_static on;
          gzip on;
          expires max;
          add_header Cache-Control public;
        }
        }

container_commands:
  01_reload_nginx:
    command: "sudo service nginx reload"
  02_remove_webapp_healthd:
    command: "rm -f /opt/elasticbeanstalk/support/conf/webapp_healthd.conf /    etc/nginx/conf.d/webapp_healthd.conf"
The section for Action Cable/websockets is:
location /cable {
  proxy_pass http://my_app_new;
  proxy_http_version 1.1;
  proxy_set_header Upgrade "websocket";
  proxy_set_header Connection "upgrade";
}
That's it. Push your changes to the server and enjoy the real time action. This feature is awesome on our site, you can try it out at makeanexam.com.
I created a live teacher panel where they can see the students taking the test and watch the grads appear in real time. Rails is not dead! I love rails and continue to work with it every day. With the integration of cool features like Action Cable Rails will continue to thrive for years to come.